Late Summer Crisp

This is going to be one of those posts where I mostly deal with ingredients, not amounts. I feel like perhaps that’s what the bulk of this blog is going to turn into – a place to document meals or ideas or inspirations that turned out nicely…and probably some horrific failures as well. I tend to list ingredients from things that turn out well on Post-Its, or if I’m really committed, write out the “recipe” in a Word document, but now there are so many options – on a blog, on a food community page, on my iPhone… I’m moving away from hard copies, even though I love them. I do still have my treasured binder of recipes that work, and a box of recipe cards from my Grandma, yet I’m still printing things out less and less. I really like it when my recipes have stains on them, and, like my dad, I write the date and notes on all recipes that I plan to make again. I like the straightforwardness of the hard copy recipe; it has one purpose only. Also you can spill on it and it’s not a big deal. Vinegar on your iPhone, bigger deal.

Late Summer Crisp

  • 1 ripe peach, diced
  • handful blueberries
  • handful raspberries
  • fresh orange juice (from half an orange)
  • sugar
  • flour
  • vanilla

For the crisp topping:

  • Whole wheat flour
  • AP flour
  • Oats
  • Pecans
  • Slivered almonds
  • Vanilla
  • Cinnamon
  • Cold butter, diced
  • Pinch salt

Toss the ingredients for the fruit together. Taste and add for sugar. Mix the crisp toppings together and bake at 350 until fruit is bubbling and topping is golden brown.

Mexican Grill

As a teacher, August means back to school. The depressing commercials start, and you feel guilty on any day that you’re not in your room getting ready. Sometimes you have to know how to distract yourself, and eating something so delicious that it still feels like the middle of summer (read: July), with stress and work still weeks away, is the perfect distraction. This combo of beef, shrimp, and corn, all cooked on the grill, has become our go to meal. Beer and margaritas can help with the distraction, too…

I’m not giving much in the way of proportions since they really depend on the number of people you’re serving and how much protein or corn you’re using. If you eyeball and are tasting frequently, then you won’t really need exact amounts. I’ll give starting points and you can go from there.

For the shrimp:

This marinade is more than the sum of its parts – honestly I think the magic ingredient is the flavor from the charcoal grill.

  • Shrimp, shelled and thawed if frozen (I usually do about 1 pound)
  • Fresh orange juice (start with half an orange)
  • Agave syrup (or honey)
  • Cumin
  • Salt
  • Neutral flavored oil

In a bowl big enough to hold the shrimp, whisk the orange juice, agave, cumin, salt, and dash of oil together. Taste for balance (you could also add a squeeze of lime juice or some minced garlic) and then add the shrimp. Toss to coat and allow to marinate for about 30 minutes to an hour.

For the beef:

  • 1 flat iron steak
  • 2 chipotle peppers in adobo (these are the base of a past to rub on the steak, so you may need more or less depending on the size of your steak)
  • cumin
  • garlic powder
  • onion powder
  • ancho chile flakes or powder
  • Mexican oregano and/or epazote, if you have any
  • Salt and pepper
  • Tequila
  • Fresh lime juice
  • Neutral flavored oil

Mash the chipotle peppers and then add the remaining ingredients to taste (if you’re using two chipotles, I’d start with about 1 teaspoon of cumin, 1/4 teaspoon of the garlic and onion powders, 1/2 teaspoon of ancho and oregano, salt and pepper to taste, a glug of tequila and a little bit of oil, and the juice of half to a whole lime). Taste the paste and adjust as necessary.

Spread the paste on the flat iron, coating evenly. Cover and marinate in the refrigerator for at least one hour.

For the corn

This has been the biggest hit of the summer!

  • Four ears of sweet corn (soak these whole in water for a couple of hours before grilling)
  • Plain yogurt
  • Mayonnaise
  • Cumin
  • Fresh lime juice
  • 1 small clove garlic, very finely minced or grated
  • Cilantro, chopped
  • Hot sauce (optional)
  • Cotija cheese (or any dry, crumbly cheese); crumbled

In a small bowl, mix the yogurt and mayo (I’ve been using about 2 parts yogurt to one part mayo), cumin, lime juice, garlic, and cilantro. Taste and adjust seasonings as necessary.

Preheat your grill. Start with the corn in its husk. Grill until charred on the outside. Remove and let cool while cooking the beef. As soon as you are able, pull the silk and husks of the corn and return to the grill. Cook the corn, turning occasionally, until the some kernels are beginning to char, some are golden brown, and some are still yellow or white. Cook the shrimp last, as they’ll only take a few minutes a side, depending on the heat of your grill.

Baste the corn with the sauce and then roll in finely crumbled cotija cheese (don’t forget the dental floss after dinner). Slice the beef thinly, and serve everything with tortillas, salsa, sour cream, cilantro, black beans, avocados, tomatoes, or whatever else you love in your tacos.

We’re making this (again) tonight, and I am going to experiment with taking the corn kernels off the corn once it’s grilled, then tossing it with the sauce, cheese, and extra lime juice. The benefit is that it will require less flossing, the downside is that it is going to enable to me eat a LOT more than I probably should. Oh well, it’s summer, right?

Emily Inspired Salmon

I love living in the Northwest. The scenery is gorgeous, and we have amazing coffee, chocolate, beer, wine, produce, and seafood wherever we look. This salmon is an extremely easy to put together, provided that you have some Japanese pantry items like I do. This is inspired by the way my friend Emily threw some of these delicious ingredients together when we were both first year teachers, trying to to keep those junior high kids from eating us alive. You can cook it under the broiler or on the grill, and I love to serve it with rice and broccoli or a simply sauteed green.

The quantities really depend on the size of the salmon, so mix the sauce together first, tasting frequently, and adjust amounts as necessary. You’ll need enough sauce to coat the fish well as you pour it over – there should be some remaining sauce around the fish so it cooks in it as well.

  • 1 side of salmon
  • 1 large shallot, thinly sliced
  • 1 clove garlic, finely minced
  • ½ teaspoon grated ginger
  • Soy Sauce
  • Mirin
  • Sake
  • Brown Sugar
  • Salt
  • Pepper

Preheat grill or broiler (if you’re in a rush, otherwise do this while you let the salmon marinate for a bit).

Lay the salmon, skin side down, on a heavy duty sheet of foil placed on a baking sheet and spray with non-stick spray (I usually use a big piece that is folded in half so it’s a double layer). Sprinkle with salt and pepper, then lay the slices shallot on top.

In a bowl or measuring cup, whisk together the soy sauce (start with about a quarter cup and go from there), garlic, ginger, sake, mirin, and brown sugar (it would also be great to add a squeeze of lime or lemon juice here, if you’ve got some citrus lying around, waiting to be used, or even a little rice vinegar). Taste and adjust seasonings as needed.

Bring up the corners of the foil so the sauce will be contained around the salmon, and then pour it over. I like to leave it to marinate for 30 minutes or an hour, so if you’ve got the time, go ahead. Otherwise, close the packet completely and cook under the broiler or on the grill until done to your liking (depending on the thickness of your salmon, I’d start checking after 8 or 10 minutes). I like to open the packet for the last few minutes so the sauce can reduce a little.

Roasted Tomato and Shrimp Pasta

It was only recently, last summer actually, that I finally appreciated fresh tomatoes and realized what all the hubbub was about. I was nearly 31 when I, for the first time, ate a raw tomato and liked it. Not surprisingly, the tomato was fresh from my own garden, not an out of season, mealy supermarket tomato.

Now that I don’t want to spit out raw tomatoes as soon as I eat them, I’m growing to truly enjoy them. So far my favorite has been sliced and sprinkled with flakey salt and pepper, drizzled in really good extra virgin olive oil and aged balsamic vinegar, and then topped with seared halloumi cheese.

I’m particularly tickled by cherry tomatoes, probably because that is what my first happy memory is attached to. They are lovely roasted, and when it’s too hot out for a complicated meal but you can find a little time to turn the oven on for just a bit (maybe in the morning when it’s a little cooler), this makes for a great summer meal.

Roasted Tomato and Shrimp Pasta with Feta

  • 2 pints cherry tomatoes
  • Olive oil
  • Salt and Pepper
  • Fresh herbs (such as thyme, oregano, rosemary)
  • 5 – 8 garlic cloves, still in their skins
  • Pinch of sugar, if the tomatoes are not summer sweet
  • 1 lb raw shrimp, peeled and deveined
  • Salt and pepper
  • Red pepper flakes
  • ½ pound whole wheat short pasta (such as penne)
  • Feta

Mix the tomatoes with the olive oil, herbs, garlic, and salt and pepper. Bake at 375 until tomatoes are just starting to burst and caramelize, and garlic is soft.

Boil the water and cook the pasta. In a large nonstick skillet, heat a little olive oil with the roasted garlic from the tomatoes (squeeze it from the skins.) Add the shrimp, salt and pepper, and red pepper flakes.

Add the tomatoes and their juices to the shrimp when they are just cooked through, then add the pasta and taste for seasoning (keep in mind the feta will add a little salt). Add feta and serve. This would also be great with a squeeze of fresh lemon.

Miso Marinated Flat Iron Steak with Yuzu Kosho

Believe it or not, this grilling recipe was created in the middle of January. Seattle isn’t really known for snowy winters, so every little bit we do get is a big deal. This year, we had a storm that was dubbed “Snowpocalypse”. Thanks to our many hills and microclimates it did manage to cripple much of the city, though I’m sure it didn’t quite amount to its name.

My husband adores grilling, no matter what the weather, and so of course he was determined to grill in the snow. Day one was burgers with green chiles, and day two was flat iron steaks, which is a great cut. It’s tender, flavorful, can feed a few or many, depending on the size, and goes on sale frequently at our local Kroger (Fred Meyer and QFC) branches.

This is really more of a wet rub than a marinade, and it gives great flavor with a minimum amount of effort. I wanted something that would use up some yuzu kosho, a spicy citrus and pepper paste, that I had brought back from Japan. This rub has become one of our favorites. You can find yuzu kosho at Asian markets, in particular any that have a good Japanese section. It’s sold in both jar and tube form.

Miso Marinated Flat Iron Steak with Yuzu Kosho

  • 1 flat iron steak
  • A few to several tablespoons of miso (enough to coat the steak)
  • Miso (I used aka miso, or red miso)
  • Yuzu kosho, start with a small squeeze – about 1 cm, and then taste and adjust
  • Sake
  • Mirin
  • Brown Sugar
  • White pepper

In a small bowl, combine the miso, yuzu kosho, a dash of sake and mirin, about 1 tablespoon of brown sugar, and several grinds of white pepper. Taste and adjust for seasoning.

Coat the steak in the rub and allow to rest for at least one hour in the fridge. Grill until cooked to desired doneness. Be sure to let it rest for 5 or 10 minutes before slicing.

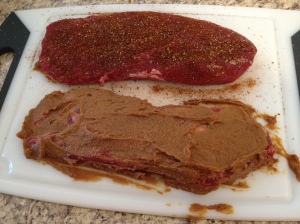
It doesn’t look pretty now, but it will definitely taste good! The steak on the bottom is the miso marinated one, the top steak is simply a seasoning salt blend from our local salt store (that doesn’t sound snooty at ALL, geez.)

Halloumi Panzanella

One of my favorite past times is the Pantry Challenge – making a meal with what’s on hand. Since yesterday was a glorious Seattle summer day, I decided on something I rarely choose: salad.

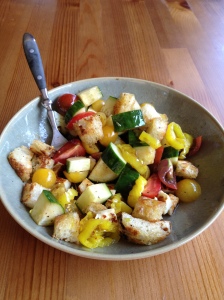
I had a handful of mixed cherry tomatoes from the farmer’s market, half a loaf of Grand Central Bakery’s Como bread languishing on the counter, and one small hunk of halloumi cheese. I was craving the cheese, so I worked around that. Since I had stale bread, croutons seemed like a good idea. Throw the tomatoes in and the lunch plan had taken shape. I also had a cucumber in the fridge, thanks to my summer obsession of drinking Pimm’s Cups in the afternoon (paired for whatever reason with my other summer obsession: spicy Cheetos). I was too lazy to make a vinaigrette, which I normally do for panzanella, and instead drizzled the salad with excellent olive oil and an 18 year old balsamic vinegar that my husband had given me for my birthday.

It turned out lovely and I was feeling very healthful until I noticed the mix of vinegar, olive oil, and tomato juices pooled at the bottom of my empty bowl, just begging to be sopped up by the leftover croutons. So, instead of a healthy proportion of vegetables to cheese and bread, I might have consumed an entire third of the loaf, cooked in butter and oil, by myself. But that’s what summer freedom is about, isn’t it?

Halloumi Panzanella

These are the approximate proportions I used for one salad. It would be easy to increase, just use your eyes and (this could be dangerous) your appetite to help you guesstimate amounts. As a guide, all of the elements of the salad should be about the same size.


For the croutons:

A good hunk of quality bread, crusts trimmed if tough, cut into bite size (about ¾ inch) cubes

Extra virgin olive oil

Butter

3 cloves garlic, halved

Salt and Pepper

 For the salad:

¼ of an English cucumber, quartered and cut into thick slices

A handful of cherry tomatoes, halved or quartered depending on size

About 2 ounces of halloumi cheese (you could also substitute fresh mozzarella or any other of your favorite sliceable cheeses – just cube and toss into the salad without cooking)

Good quality extra virgin olive oil

A good aged balsamic vinegar (if you just have regular balsamic, reduce it in a small saucepan until it reaches a syrupy drizzling consistency.)

Salt and pepper (I happened to have flaked Cornish sea salt that I brought back from vacation, but any fancy flakey salt, such as Kosher, Maldon, Fleur de Sel,  or Murray Pink would work!)

Optional: sliced salami, peperoncinis or mixed baby greens. I usually add all of these when I make my regular panzanella, and if you need a more substantial salad, feel free. However, I wanted this to taste simply of summer, and felt that it didn’t need the additions at all. I put in peperoncinis and wished I hadn’t.

In a sauté pan, heat an even amount of olive oil and butter with the garlic until just starting to sizzle. You’ll need enough to coat all of the bread cubes, and can always add a little more if you need to. Toss in the bread cubes and sprinkle with salt and pepper. Saute over medium low to medium heat, tossing frequently until the croutons are golden and crisp on the outside. If you notice the garlic getting any more than a rich golden brown, fish them out and toss them.

Meanwhile, assemble the salad. Cut the vegetables and place them in a bowl. Cube the cheese and leave on the cutting board. Once the croutons are done, empty them onto a plate lined with a paper towel, and wipe out the pan. Replace on the heat and add the halloumi. Turn frequently until golden brown on all sides. If you don’t have a nonstick pan (I happened to use stainless steel), they may stick slightly. Just scrape up any cheesy residue so it doesn’t burn (I snack on this) and keep turning – you’ll figure out pretty quickly when they need to be turned. This cheese is meant to be cooked (it is GREAT on the barbeque) so it should behave fairly well.

Sprinkle salt and pepper on the veggies in the bowl, top with the cheese and croutons, then drizzle with the oil and vinegar. Toss and taste. Adjust seasonings as necessary, then dig in!